创建Yum缓存代理服务
通常情况下,我们提供的自定义yum本地源压缩包中包含了大数据平台部署、运行和维护过程中的所有软件rpm包。除非是有特殊需要,比如开发人员试验某些新软件包的功能,或是运维人员安装自己熟悉的某些工具软件等,才需要从外部导入rpm包。因此,绝大多数场景下这个步骤都是可选的,运维人员要根据自己的实际需求来决定是否执行该步骤。
在需要导入外部rpm包的情况下,由于生产环境通常都是与外网进行隔离的,就算是可以通过其他手段获取到外网权限,但是通过修改集群中某些主机的网络配置和repo文件很显然是非常低效和十分危险的,极易造成集群主机之间的配置不一致,甚至数据泄露或丢失。
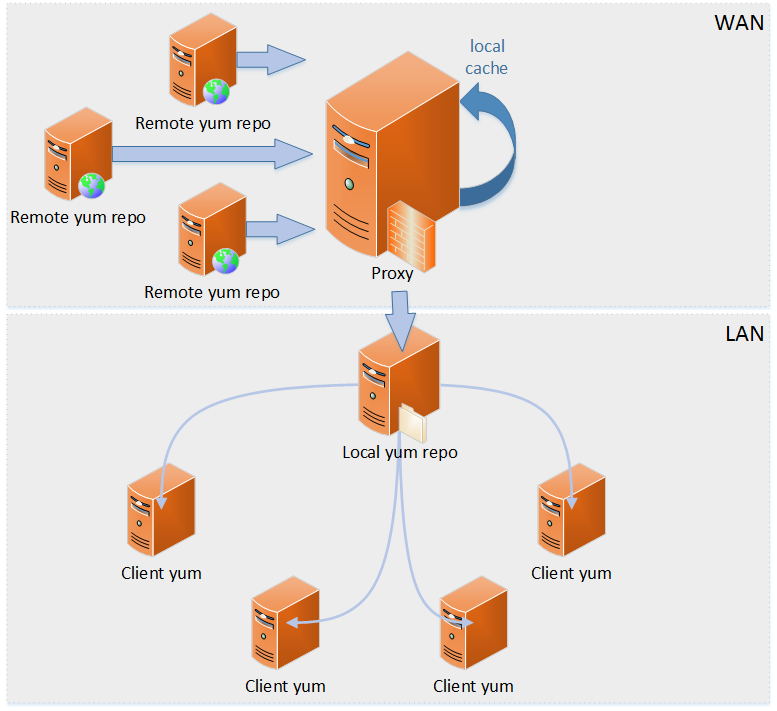
理想的解决方案应该是:
- yum安装软件时优先从集群内的本地源中查找,若存在则直接下载并安装。
- 若没有找到合适的rpm包,则将http请求转发到一台具有外网访问权限的proxy主机。
- proxy解析并执行该http请求进而从外部的标准源中获取rpm包,并缓存在本地。
- 将rpm包转发给原始请求的那台主机,yum完成软件安装。
其结构图如下:
Centos7环境下目前没有开源的工具能够满足以上的解决方案,不过Ubuntu14环境下有一个apt-cacher-ng的工具能满足要求,并且其最新版本增加了对yum所使用的rpm及repodata的支持。接下来描述的就是其实际安装和配置过程。
proxy主机初始化
利用Usb的系统安装盘在proxy主机上安装Ubuntu 14.04.5 LTS操作系统,安装完成后首先配置主机名。
hostnamectl set-hostname proxy.bigdata.wh.com #设置主机名
然后利用ifconfig查询Ubuntu系统识别的网卡信息,执行结果如下。
root@proxy:/etc/network# ifconfig
eth0      Link encap:Ethernet  HWaddr 08:00:27:54:e0:3b         #以太网口eth1
          inet addr:10.0.2.15  Bcast:10.0.2.255  Mask:255.255.255.0
          inet6 addr: fe80::a00:27ff:fe54:e03b/64 Scope:Link
          UP BROADCAST RUNNING MULTICAST  MTU:1500  Metric:1
          RX packets:22809 errors:0 dropped:0 overruns:0 frame:0
          TX packets:4259 errors:0 dropped:0 overruns:0 carrier:0
          collisions:0 txqueuelen:1000
          RX bytes:31386840 (31.3 MB)  TX bytes:344498 (344.4 KB)

eth1      Link encap:Ethernet  HWaddr 08:00:27:a0:59:b6          #以太网口eth1
          inet addr:192.168.36.111  Bcast:192.168.37.255  Mask:255.255.254.0
          inet6 addr: fe80::a00:27ff:fea0:59b6/64 Scope:Link
          UP BROADCAST RUNNING MULTICAST  MTU:1500  Metric:1
          RX packets:76679 errors:0 dropped:0 overruns:0 frame:0
          TX packets:3088 errors:0 dropped:0 overruns:0 carrier:0
          collisions:0 txqueuelen:1000
          RX bytes:8766387 (8.7 MB)  TX bytes:401980 (401.9 KB)

lo        Link encap:Local Loopback                               #单机环回网卡
          inet addr:127.0.0.1  Mask:255.0.0.0
          inet6 addr: ::1/128 Scope:Host
          UP LOOPBACK RUNNING  MTU:65536  Metric:1
          RX packets:34 errors:0 dropped:0 overruns:0 frame:0
          TX packets:34 errors:0 dropped:0 overruns:0 carrier:0
          collisions:0 txqueuelen:0
          RX bytes:4547 (4.5 KB)  TX bytes:4547 (4.5 KB)
Ubuntu 14系统的网络主配置文件为/etc/network/interfaces,通常情况下主配置文件只配置loopback本地环回,其他的以每个网口对应于一个eth\*.cfg配置文件的方式存放在/etc/network/interfaces.d目录下,并且通过主配置文件来全部加载。
root@proxy:/etc/network# cat interfaces
# This file describes the network interfaces available on your system
# and how to activate them. For more information, see interfaces(5).

# The loopback network interface
auto lo
iface lo inet loopback

# Source interfaces
# Please check /etc/network/interfaces.d before changing this file
# as interfaces may have been defined in /etc/network/interfaces.d
# NOTE: the primary ethernet device is defined in
# /etc/network/interfaces.d/eth0
# See LP: #1262951
#其他的网口配置以eth0.cfg、eth1.cfg的方式存放在该目录,并在此处加载
source /etc/network/interfaces.d/*.cfg

#VAGRANT-BEGIN
# The contents below are automatically generated by Vagrant. Do not modify.
#Vagrant工具自动配置的网口,直接在主配置文件中附加了定义
auto eth1
iface eth1 inet dhcp
    post-up route del default dev $IFACE || true
#VAGRANT-END
然后,根据proxy主机的物理网口连接情况和机房内所属网段的路由设置,选择使用哪个网口以及何种网络配置方式。
- 若路由器支持DHCP方式连接,则按照如下方式配置所选的以太网口。
root@proxy:/etc/network# cat interfaces.d/eth1.cfg
# The primary network interface
auto eth1
iface eth1 inet dhcp
- 若路由器只允许以指定的静态IP方式连接,则按照如下方式来配置所选的以太网口。
root@proxy:/etc/network# cat interfaces.d/eth1.cfg
# The primary network interface
auto eth1
iface eth1 inet static
address 192.168.36.100
gateway 192.168.37.254
netmask 255.255.254.0
完成配置后,需要利用ifdown/ifup命令来重启该以太网口。
vagrant@proxy:~$ sudo ifdown eth1
Internet Systems Consortium DHCP Client 4.2.4
Listening on LPF/eth1/08:00:27:a0:59:b6
Sending on   LPF/eth1/08:00:27:a0:59:b6
Sending on   Socket/fallback
DHCPRELEASE on eth1 to 192.168.30.254 port 67 (xid=0x157b26fb)

vagrant@proxy:~$ sudo ifup eth1
Internet Systems Consortium DHCP Client 4.2.4
Listening on LPF/eth1/08:00:27:a0:59:b6
Sending on   LPF/eth1/08:00:27:a0:59:b6
Sending on   Socket/fallback
DHCPDISCOVER on eth1 to 255.255.255.255 port 67 interval 3 (xid=0x89fef906)
DHCPREQUEST of 192.168.36.111 on eth1 to 255.255.255.255 port 67 (xid=0x6f9fe89)
DHCPOFFER of 192.168.36.111 from 192.168.37.254
DHCPACK of 192.168.36.111 from 192.168.37.254
bound to 192.168.36.111 -- renewal in 17083 seconds.
SIOCDELRT: No such process
为了让集群中的其他主机能够通过主机名来访问proxy缓存,需要在本地DNS服务器的bigdata.wh.com区域正向和方向解析库文件中分列添加A记录和PTR记录。
proxy   IN      A       192.168.36.111  #bigdata.wh.com.zone

111 IN PTR proxy.bigdata.wh.com.        #36.168.192.in-addr.arpa.zone
最后,手动修改/etc/resolv.conf文件添加ISP提供的DNS服务器地址,以便能够访问外网。
root@proxy:~# cat /etc/resolv.conf
# Dynamic resolv.conf(5) file for glibc resolver(3) generated by resolvconf(8)
#     DO NOT EDIT THIS FILE BY HAND -- YOUR CHANGES WILL BE OVERWRITTEN
nameserver 10.0.2.3
nameserver 192.168.30.1
apt-cacher-ng安装及配置
Ubuntu 14操作系统默认源修改成国内源,以加快访问和下载速度。
cat << eof > /etc/apt/sources.list
deb http://mirrors.aliyun.com/ubuntu/ trusty main restricted universe multiverse
deb http://mirrors.aliyun.com/ubuntu/ trusty-security main restricted universe multiverse
deb http://mirrors.aliyun.com/ubuntu/ trusty-updates main restricted universe multiverse
deb http://mirrors.aliyun.com/ubuntu/ trusty-proposed main restricted universe multiverse
deb http://mirrors.aliyun.com/ubuntu/ trusty-backports main restricted universe multiverse
deb-src http://mirrors.aliyun.com/ubuntu/ trusty main restricted universe multiverse
deb-src http://mirrors.aliyun.com/ubuntu/ trusty-security main restricted universe multiverse
deb-src http://mirrors.aliyun.com/ubuntu/ trusty-updates main restricted universe multiverse
deb-src http://mirrors.aliyun.com/ubuntu/ trusty-proposed main restricted universe multiverse
deb-src http://mirrors.aliyun.com/ubuntu/ trusty-backports main restricted universe multiverse
eof
利用apt-get命令安装apt-cacher-ng和服务管理程序sysv-rc-conf。
apt-get install -y apt-cacher-ng sysv-rc-conf
启动apt-cacher-ng服务并配置跟随系统自启动。
service apt-cacher-ng start
sysv-rc-conf apt-cacher-ng on
关闭防火墙ufw。
ufw disable
通过Web浏览器访问apt-cacher-ng主页。
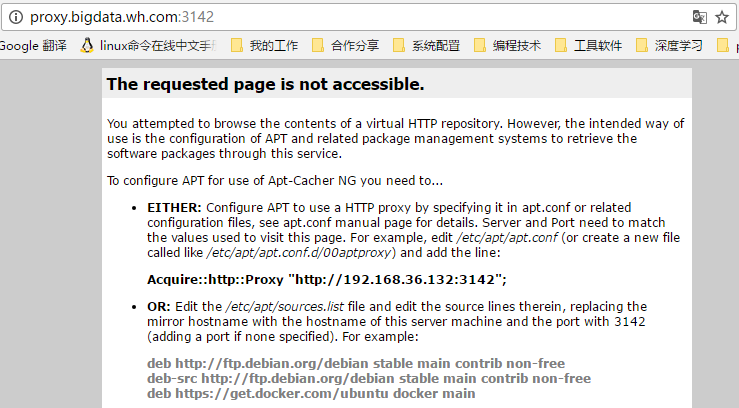
apt-cacher-ng的主配置文件路径为/etc/apt-cacher-ng/acng.conf,编辑acng.conf确保以下配置项有效。
CacheDir: /var/cache/apt-cacher-ng     #存储已下载完毕的rpm包的缓存目录
LogDir: /var/log/apt-cacher-ng         #默认的日志文件存放路径
SupportDir: /usr/lib/apt-cacher-ng     #存放辅助文件及脚本的默认端口
Port:3142                              #默认的http访问端口
ReportPage: acng-report.html           #在默认的web生成统计报告
VerboseLog: 1                          #记录更详细的Log信息
另外,在acng.conf中有多列以'Remap-‘作为前缀的配置项,这每一行都表示一个资源重定向规则,其语法表示为:Remap-RepositoryName: MergingURLs ; TargetURLs ; OptionalFlags。不过需要注意的是MergingURLs默认的根路径是SupportDir,而TargetURLs默认的根路径是/etc/apt-cacher-ng。
# Repository remapping. See manual for details.
# In this example, some backends files might be generated during package
# installation using information collected on the system.
# Examples:
Remap-debrep: file:deb_mirror*.gz /debian ; file:backends_debian # Debian Archives
Remap-uburep: file:ubuntu_mirrors /ubuntu ; file:backends_ubuntu # Ubuntu Archives
Remap-debvol: file:debvol_mirror*.gz /debian-volatile ; file:backends_debvol # Debian Volatile Archives
Remap-cygwin: file:cygwin_mirrors /cygwin # ; file:backends_cygwin # incomplete
Remap-sfnet:  file:sfnet_mirrors # ; file:backends_sfnet # incomplete
Remap-alxrep: file:archlx_mirrors /archlinux # ; file:backend_archlx # Arch Linux
Remap-fedora: file:fedora_mirrors # Fedora Linux
Remap-epel:   file:epel_mirrors # Fedora EPEL
Remap-slrep:  file:sl_mirrors # Scientific Linux
于是我们来添加一个基于Centos7的rpm资源包的重定向规则。
Remap-centos: file:centos_mirrors /centos ; file:backends_centos # Centos Rpm
然后再创建文件centos_mirrors和backends_centos,表示所有来自于centos_mirrors定义地址的http请求全部被重定向到backends_centos定义的某个地址。
- centos_mirrors文件
该文件所包含的是Centos官方所定义的若干外部源地址,我们可以通过一个简单的脚本来生成它。
cat << 'eof' > /usr/lib/apt-cacher-ng/fetch-centos.sh
#!/bin/bash

URL="http://www.centos.org/download/full-mirrorlist.csv"
INFILE=$(mktemp -t mirror-list-centos.XXXXXX)
OUTFILE="centos_mirrors"

wget --no-check-certificate -q -O "${INFILE}" "${URL}"

tail -n+2 "${INFILE}" | awk -F '","' '{print $5}' > ${OUTFILE}
tail -n+2 "${INFILE}" | awk -F '","' '{print $6}' >> ${OUTFILE}

sed -i'' '/^\s*$/d' ${OUTFILE}

rm -f ${INFILE}
eof
为fetch-centos.sh添加执行权限并执行脚本生成centos_mirrors文件。
chmod +x /usr/lib/apt-cacher-ng/fetch-centos.sh
source /usr/lib/apt-cacher-ng/fetch-centos.sh
mv centos_mirrors /usr/lib/apt-cacher-ng/
- backends_centos文件
cat << eof > /etc/apt-cacher-ng/backends_centos
http://mirrors.aliyun.com/centos/
http://mirrors.cn99.com/centos/
eof
但是外部源开启GPG-KEY验证时,安装部分软件会出现“"403 Forbidden”错误。这是由于在apt-cacher-ng的默认配置中未包含RPM-GPG-KEY类型的文件,yum通过其代理下载相应KEY文件时被自动屏蔽了,解决该文件需要配置VfilePatternEx参数来添加RPM-GPG-KEY类型的文件。
VfilePatternEx: ^(/\?release=[0-9]+&arch=.*|.*/RPM-GPG-KEY-.*|/metalink\?repo=epel\-[0-9]+&arch=.*)$
重新启动apt-cacher-ng服务。
root@proxy:/etc/apt-cacher-ng# service apt-cacher-ng restart
 * Restarting apt-cacher-ng apt-cacher-ng
集群主机代理配置
为了让集群主机使用我们已经创建好的apt-cacher-ng缓存代理服务,有在yum.conf中添加proxy配置项和在repo文件中添加proxy配置项两种,前者是针对所有源的全局性修改,后者是针对特定源的局部性修改。
根据我们的实际需求,在创建的本地源中,那些大数据平台包含的Server、Agent以及各种Hadoop组件应该通过直接访问的方式来更新和下载,而它们所依赖的一些系统基础包或第三方辅助包应该在离线环境下,通过代理服务来完成更新和下载。
- 首先下载阿里云的repo文件。
wget -O /etc/yum.repos.d/CentOS7-Base-aliyun.repo http://repo.bigdata.wh.com/resource/CentOS7-Base-aliyun.repo
- 然后修改阿里云的repo文件/etc/yum.repos.d/CentOS7-Base-aliyun.repo,使其http请求通过
proxy.bigdata.wh.com来进行代理和重定向。
[root@server yum.repos.d]# cat CentOS7-Base-aliyun.repo

[base]
name=CentOS-$releasever - Base - mirrors.aliyun.com
failovermethod=priority
baseurl=http://mirrors.aliyun.com/centos/$releasever/os/$basearch/
        http://mirrors.aliyuncs.com/centos/$releasever/os/$basearch/
#mirrorlist=http://mirrorlist.centos.org/?release=$releasever&arch=$basearch&repo=os
gpgcheck=1
gpgkey=http://mirrors.aliyun.com/centos/RPM-GPG-KEY-CentOS-7
proxy=http://proxy.bigdata.wh.com:3142/         #为base添加代理

#released updates
[updates]
name=CentOS-$releasever - Updates - mirrors.aliyun.com
failovermethod=priority
baseurl=http://mirrors.aliyun.com/centos/$releasever/updates/$basearch/
        http://mirrors.aliyuncs.com/centos/$releasever/updates/$basearch/
#mirrorlist=http://mirrorlist.centos.org/?release=$releasever&arch=$basearch&repo=updates
gpgcheck=1
gpgkey=http://mirrors.aliyun.com/centos/RPM-GPG-KEY-CentOS-7
proxy=http://proxy.bigdata.wh.com:3142/         #为updates添加代理

#additional packages that may be useful
[extras]
name=CentOS-$releasever - Extras - mirrors.aliyun.com
failovermethod=priority
baseurl=http://mirrors.aliyun.com/centos/$releasever/extras/$basearch/
        http://mirrors.aliyuncs.com/centos/$releasever/extras/$basearch/
#mirrorlist=http://mirrorlist.centos.org/?release=$releasever&arch=$basearch&repo=extras
gpgcheck=1
gpgkey=http://mirrors.aliyun.com/centos/RPM-GPG-KEY-CentOS-7
proxy=http://proxy.bigdata.wh.com:3142/          #为extras添加代理

#additional packages that extend functionality of existing packages
[centosplus]
name=CentOS-$releasever - Plus - mirrors.aliyun.com
failovermethod=priority
baseurl=http://mirrors.aliyun.com/centos/$releasever/centosplus/$basearch/
        http://mirrors.aliyuncs.com/centos/$releasever/centosplus/$basearch/
#mirrorlist=http://mirrorlist.centos.org/?release=$releasever&arch=$basearch&repo=centosplus
gpgcheck=1
enabled=0
gpgkey=http://mirrors.aliyun.com/centos/RPM-GPG-KEY-CentOS-7
proxy=http://proxy.bigdata.wh.com:3142/          #为centosplus添加代理

#contrib - packages by Centos Users
[contrib]
name=CentOS-$releasever - Contrib - mirrors.aliyun.com
failovermethod=priority
baseurl=http://mirrors.aliyun.com/centos/$releasever/contrib/$basearch/
        http://mirrors.aliyuncs.com/centos/$releasever/contrib/$basearch/
#mirrorlist=http://mirrorlist.centos.org/?release=$releasever&arch=$basearch&repo=contrib
gpgcheck=1
enabled=0
gpgkey=http://mirrors.aliyun.com/centos/RPM-GPG-KEY-CentOS-7
proxy=http://proxy.bigdata.wh.com:3142/          #为contrib添加代理
- 更新yum缓存,检测配置是否成功。
yum clean all
yum makecache
查看proxy缓存
完成yum缓存更新后,可以在proxy主机的代理缓存目录/var/cache/apt-cacher-ng内找到repodata信息,如果proxy下载了rpm包,它们也会被存储在这个目录下。
root@proxy:/var/cache/apt-cacher-ng# tree -L 5 centos/
centos/
└── 7
    ├── extras
    │   └── x86_64
    │       └── repodata
    │           ├── b9ef6cf87b7680ec9aeba7da9fbddd3c0f672850f42042e90a5571f3d22dd2a0-filelists.sqlite.bz2
    │           ├── b9ef6cf87b7680ec9aeba7da9fbddd3c0f672850f42042e90a5571f3d22dd2a0-filelists.sqlite.bz2.head
    │           ├── ccd64088c86ba61f69b059b50c00c34a5e756b5cae3a2c671bd47e372a711a85-primary.sqlite.bz2
    │           ├── ccd64088c86ba61f69b059b50c00c34a5e756b5cae3a2c671bd47e372a711a85-primary.sqlite.bz2.head
    │           ├── dbcca46a3dcc5a733cd9f02ab4aed05943047f4995e93fdb219213c7e009f62e-other.sqlite.bz2
    │           ├── dbcca46a3dcc5a733cd9f02ab4aed05943047f4995e93fdb219213c7e009f62e-other.sqlite.bz2.head
    │           ├── e4659f8012fd7e99c8adccbf4b4eecf0af3d38bc64c51d8bc061c40ffb2d508b-prestodelta.xml.gz
    │           ├── e4659f8012fd7e99c8adccbf4b4eecf0af3d38bc64c51d8bc061c40ffb2d508b-prestodelta.xml.gz.head
    │           ├── repomd.xml
    │           └── repomd.xml.head
    ├── os
    │   └── x86_64
    │       └── repodata
    │           ├── 3a1b41925bb25892c1003b22979ea0705aa815fed57f992cf0229b76539a9ac4-filelists.sqlite.bz2
    │           ├── 3a1b41925bb25892c1003b22979ea0705aa815fed57f992cf0229b76539a9ac4-filelists.sqlite.bz2.head
    │           ├── bd50ff3d861cc21d254a390a963e9f0fd7b7b96ed9d31ece2f2b1997aa3a056f-primary.sqlite.bz2
    │           ├── bd50ff3d861cc21d254a390a963e9f0fd7b7b96ed9d31ece2f2b1997aa3a056f-primary.sqlite.bz2.head
    │           ├── c55e5b7bbe933fa8dac2cffca4596c265812b74ed12ef3968d487dd6eb22ad93-c7-x86_64-comps.xml.gz
    │           ├── c55e5b7bbe933fa8dac2cffca4596c265812b74ed12ef3968d487dd6eb22ad93-c7-x86_64-comps.xml.gz.head
    │           ├── f7ed48f490360933445293386b7c300d55b31bc639a9bc98d6c5365c702719a9-other.sqlite.bz2
    │           ├── f7ed48f490360933445293386b7c300d55b31bc639a9bc98d6c5365c702719a9-other.sqlite.bz2.head
    │           ├── repomd.xml
    │           └── repomd.xml.head
    └── updates
        └── x86_64
            └── repodata
                ├── 3ea8c61f1c12741135aba7c0422e4b74fb072be9a43775385c12feda4acb4059-prestodelta.xml.gz
                ├── 3ea8c61f1c12741135aba7c0422e4b74fb072be9a43775385c12feda4acb4059-prestodelta.xml.gz.head
                ├── 5515a534747cd7cd585f9c77641a0d7a18125e2910176e132fe8d88d07fbd0bc-other.sqlite.bz2
                ├── 5515a534747cd7cd585f9c77641a0d7a18125e2910176e132fe8d88d07fbd0bc-other.sqlite.bz2.head
                ├── 68826be45b4c9e22f7b586290945b0d1cec66297b13a73a81215d1fdf2c7297f-filelists.sqlite.bz2
                ├── 68826be45b4c9e22f7b586290945b0d1cec66297b13a73a81215d1fdf2c7297f-filelists.sqlite.bz2.head
                ├── 84362bc7c7e9732f7781d7fdc02ace9c9a3157bc94a2ebe40448a5759c714f22-primary.sqlite.bz2
                ├── 84362bc7c7e9732f7781d7fdc02ace9c9a3157bc94a2ebe40448a5759c714f22-primary.sqlite.bz2.head
                ├── repomd.xml
                └── repomd.xml.head

10 directories, 30 files