创建YUM本地源
最常用的创建和加载自定义yum本地源的方法有以下三种:
- 下载已整理好的自定义源ISO镜像文件,直接挂载到本地文件系统,在本机上通过
file:的方式访问。 - 下载已整理好的自定义源TAR压缩文件,解压后创建Ftp文件服务器,在局域网通过
ftp:的方式访问。 - 下载已整理好的自定义源TAR压缩文件,解压后创建Web文件服务器,在局域网通过
http:的方式访问。
我们选择安装和配置都比较简单Apache httpd来实现基于http的Web服务器。
获取自定义源压缩包
我们对大数据平台所包含的Server、Agent、Hadoop服务组件,以及所依赖的第三方软件rpm包和其他资源都进行了汇总和整理,制作成了本地的自定义源后重新打包并进行版本更新和维护。
- 下载
从公司内网的Ftp服务器上下载bigdata-2.5.0.3-centos7.tar.gz,其地址为ftp://192.168.16.100/bigdata-2.5.0.3-centos7.tar.gz。
- 解压
将自定义源解压至/home/repo目录,通过tree命令查看其文件系统结构如下:
[root@repo repo]# tree -L 2
.
|-- ambari  #Server相关的rpm包
|   `-- centos7
|-- common  #依赖的第三方软件rpm包
|   `-- centos7
|-- component  #核心组件rpm包
|   |-- HDF
|   |-- HDP   #Hadoop组件
|   `-- HDP-UTILS-1.1.0.21  #Hadoop组件工具包
`-- resource  #Jdk、jdbc等资源
    |-- ambari.repo
    |-- CentOS7-Base-aliyun.repo
    |-- jce_policy-8.zip
    |-- jdk-8u112-linux-x64.tar.gz
    |-- jdk-8u77-linux-x64.tar.gz
    |-- postgresql-jdbc.jar
    `-- repodata

10 directories, 6 files
配置本机的YUM源
- 有永久或临时外网访问权限
为了取得更快的安装速度,将默认的国外源更新为国内的阿里源。首先备份备份默认源。
mv /etc/yum.repos.d /etc/yum.repos.d.bak
然后下载对应版本的repo文件,放入/etc/yum.repos.d/。
mkdir /etc/yum.repos.d
wget -O /etc/yum.repos.d/CentOS7-Base-aliyun.repo http://mirrors.aliyun.com/repo/Centos-7.repo
- 没有外网访问权限
直接使用之前解压的/home/repo/common目录作为源,通过file://的方式来配置repo文件。同样首先备份下默认源。
mv /etc/yum.repos.d /etc/yum.repos.d.bak
然后编辑生成使用本地文件系统的repo文件,放入/etc/yum.repos.d/。
cat << eof > /etc/yum.repos.d/localfile.repo
[localfile]
name=local file system repository
baseurl=file:///home/repo/common
gpgcheck=0
enabled=1
priority=1
eof
- 更新yum缓存的数据。
yum clean all
yum makecache
安装YUM工具和插件
为了方便后期扩充自己所需的软件包,以及在涉及到多个源之后所需要的优先级管理,接下来安装yum周边的工具和插件。
#createrepo命令创建版本库所需要的基础rpm包
yum install -y yum-utils createrepo

#yum插件,安装后可根据priority值来设置优先级
yum install -y yum-plugin-priorities
配置Apache httpd服务
通过配置httpd虚拟主机的方式实现一个简单的Web文件服务器,以此为基础来架设集群内的本地源。
- 首先安装Apache httpd服务。
yum install -y httpd
安装完成后进入httpd生成的主配置目录/etc/httpd,它的文件结构及意义如下。
[root@repo httpd]# tree
#主配置目录,通过修改其中的httpd.conf文件来完成配置
|-- conf
|   |-- httpd.conf
|   `-- magic
#扩展配置目录,在主配置文件httpd.conf中,
#通过Include conf.d/*的方式来载入该目录中的配置
|-- conf.d
|   |-- autoindex.conf
|   |-- README
|   |-- userdir.conf
|   `-- welcome.conf
#httpd核心模块目录
|-- conf.modules.d
|   |-- 00-base.conf
|   |-- 00-dav.conf
|   |-- 00-lua.conf
|   |-- 00-mpm.conf
|   |-- 00-proxy.conf
|   |-- 00-systemd.conf
|   `-- 01-cgi.conf
|-- logs -> ../../var/log/httpd
|-- modules -> ../../usr/lib64/httpd/modules
`-- run -> /run/httpd

6 directories, 13 files
- 在80端口配置虚拟主机用于通过http方式访问自定义源
/home/repo目录,将新建虚拟主机配置文件放在httpd扩展目录/etc/httpd/conf.d中。
cat << eof > /etc/httpd/conf.d/local_repo.conf
<VirtualHost *:80>              #虚拟主机工作在80端口
  DocumentRoot "/home/repo"     #我们定义的根目录
  <Directory "/home/repo">
    #访问控制组合指令
    Options Indexes FollowSymLinks
    AllowOverride None
    Require all granted
  </Directory>
</VirtualHost>
eof
Options指令含义如下:
Indexes:在无默认主页面又无欢迎页时,将所有资源以列表形式呈现给用户
FollowSymLinks:允许跟踪符号链接文件
AllowOverride指令含义:
表示支持在每个页面目录下创建
.htaccess文件,来定义对此目录中资源的访问控制,设置为None时表示忽略.htaccess 文件
Require指令含义:
all:包含所有主机
ip:包含指定的地址
not ip:排除指定的地址
granted:表示允许访问
denied:表示拒绝访问
- 将新创建虚拟主机
conf.d/local_repo.conf添加至主配置httpd.conf末尾。
[root@repo httpd]# vi conf/httpd.conf

#
# ServerName gives the name and port that the server uses to identify itself.
# This can often be determined automatically, but we recommend you specify
# it explicitly to prevent problems during startup.
#
# If your host doesn't have a registered DNS name, enter its IP address here.
#
ServerName repo.bigdata.wh.com          #设置为当前主机的FQDN

#EnableMMAP off
EnableSendfile on

# Supplemental configuration
#
# Load config files in the "/etc/httpd/conf.d" directory, if any.
#IncludeOptional conf.d/*.conf          #注释掉默认的apache欢迎页面
IncludeOptional conf.d/local_repo.conf  #在文件末尾包含新增的虚拟主机扩展配置文件
IncludeOptional conf.d/autoindex.conf   #autoindex.conf中定义了显示文件列表时的系统图标资源
- 通过httpd自带的命令来检测当前配置是否有错误。
[root@repo httpd]# httpd -S
VirtualHost configuration:
*:80                   repo.bigdata.wh.com (/etc/httpd/conf.d/local_repo.conf:1)
ServerRoot: "/etc/httpd"
Main DocumentRoot: "/var/www/html"
Main ErrorLog: "/etc/httpd/logs/error_log"
Mutex proxy-balancer-shm: using_defaults
Mutex rewrite-map: using_defaults
Mutex authdigest-client: using_defaults
Mutex proxy: using_defaults
Mutex authn-socache: using_defaults
Mutex default: dir="/run/httpd/" mechanism=default
Mutex mpm-accept: using_defaults
Mutex authdigest-opaque: using_defaults
PidFile: "/run/httpd/httpd.pid"
Define: DUMP_VHOSTS
Define: DUMP_RUN_CFG
User: name="apache" id=48
Group: name="apache" id=48
- 启动
httpd.service服务,并设置跟随系统自启动。
systemctl restart httpd.service
systemctl enable httpd.service
- 关闭防火墙
firewalld.service。
systemctl stop firewalld.service
systemctl disable firewalld.service
- 关闭
Selinux
#临时关闭Selinux
setenforce 0

#开机不启动Selinux
sed -i 's/SELINUX=.*/SELINUX=disabled/' /etc/selinux/config
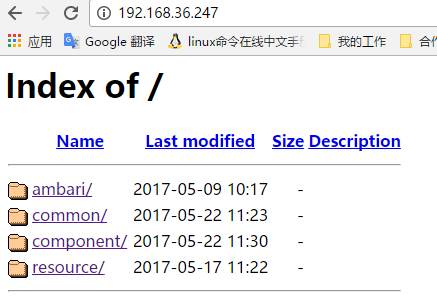
- 通过Web浏览器访问自定义源80端口的文件目录。
- 查看
/home/repo/resource目录下的本地源repo文件,检查其默认的baseurl是否与新建的本地源路径相同。
[root@repo repo]# cat resource/ambari-2.5.0.3.repo
[ambari-2.5.0.3]
name=ambari local repository
baseurl=http://repo.bigdata.wh.com/ambari/centos7/2.x/updates/2.5.0.3/
gpgcheck=0
enabled=1
priority=1
proxy=_none_

[common]
name=common local repository
baseurl=http://repo.bigdata.wh.com/common/centos7/
gpgcheck=0
enabled=1
priority=1
proxy=_none_
以上步骤全部完成之后,集群所需要的自定义本地源就创建成功了。